Edge-Lit Model Installation

Step 1:
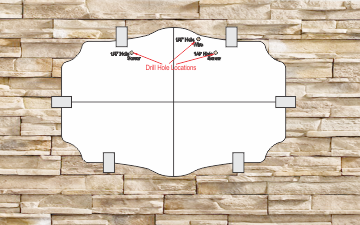
Figure out the selected location and the lower centerline of your address sign and attach the provided installation template on your selcted location with Tape.
Step 2:
Using the provided 1/4" drill bit, drill into the back wall on the marked locations for screws by about 1" depth and for the wire drill in a through hole.
Step 3:
Remove the template and after cleaning the drilled holes from debris put in the provided roll plaques into the screw holes and screw in the provided screws until only 1/4" including the screw head left out.
Step 4:
Pass the 12VDC wire through the wire hole using a wire fishing wire while hilding the sign. Then hang in the sign by sliding in the back hanging slots on the installed screws.

Step 5:
Connect the other side of the passed through wire to the adapter connector by connecting RED wire to the Positive and BLACK wire to the Negative terminal. Then plug in the adapter into a 110VAC wall socket.